Interactive labeling with Jupyter
In this example, the active learning workflow of modAL is demonstrated - with you in the loop! By running this notebook, you’ll be queried to label digits using the DIGITS dataset. If you would like to try this out, you can download this notebook here!
[1]:
import numpy as np

from modAL.models import ActiveLearner
from modAL.uncertainty import uncertainty_sampling

from sklearn.datasets import load_digits
from sklearn.model_selection import train_test_split
from sklearn.ensemble import RandomForestClassifier

from IPython import display
from matplotlib import pyplot as plt
%matplotlib inline
/home/namazu/.local/lib/python3.6/site-packages/sklearn/ensemble/weight_boosting.py:29: DeprecationWarning: numpy.core.umath_tests is an internal NumPy module and should not be imported. It will be removed in a future NumPy release.
  from numpy.core.umath_tests import inner1d
The dataset
Now we set up the initial training set for our classifier. If you would like to play around, you can try to modifiy the value n_initial below and see if it impacts the algorithm!
[2]:
n_initial = 100
[3]:
X, y = load_digits(return_X_y=True)
X_train, X_test, y_train, y_test = train_test_split(X, y)

initial_idx = np.random.choice(range(len(X_train)), size=n_initial, replace=False)

X_initial, y_initial = X_train[initial_idx], y_train[initial_idx]
X_pool, y_pool = np.delete(X_train, initial_idx, axis=0), np.delete(y_train, initial_idx, axis=0)
Initializing the learner
Now we initialize the active learner. Feel free to change the underlying RandomForestClassifier or the uncertainty_sampling!
[4]:
learner = ActiveLearner(
    estimator=RandomForestClassifier(),
    query_strategy=uncertainty_sampling,
    X_training=X_initial, y_training=y_initial
)
We also set how many queries we want to make. The more the better! (Usually :) )
[5]:
n_queries = 20
The active learning loop
[6]:
accuracy_scores = [learner.score(X_test, y_test)]
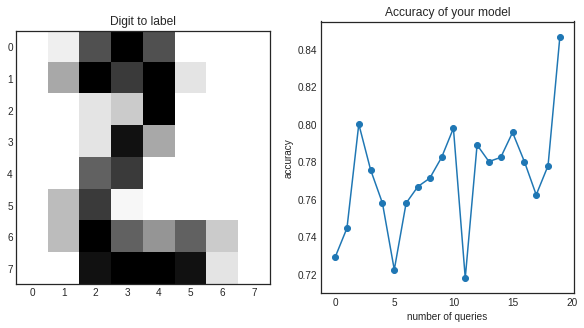
for i in range(n_queries):
display.clear_output(wait=True)
query_idx, query_inst = learner.query(X_pool)
with plt.style.context('seaborn-white'):
plt.figure(figsize=(10, 5))
plt.subplot(1, 2, 1)
plt.title('Digit to label')
plt.imshow(query_inst.reshape(8, 8))
plt.subplot(1, 2, 2)
plt.title('Accuracy of your model')
plt.plot(range(i+1), accuracy_scores)
plt.scatter(range(i+1), accuracy_scores)
plt.xlabel('number of queries')
plt.ylabel('accuracy')
display.display(plt.gcf())
plt.close('all')
print("Which digit is this?")
y_new = np.array([int(input())], dtype=int)
learner.teach(query_inst.reshape(1, -1), y_new)
X_pool, y_pool = np.delete(X_pool, query_idx, axis=0), np.delete(y_pool, query_idx, axis=0)
accuracy_scores.append(learner.score(X_test, y_test))
Which digit is this?
2
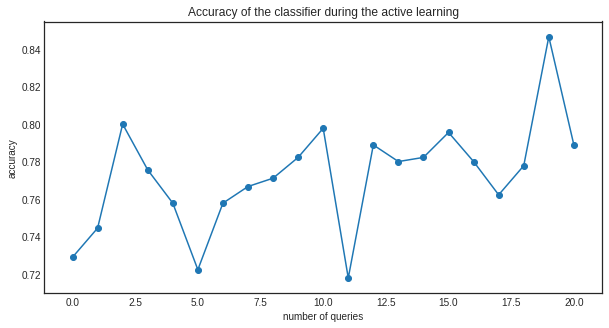
Finally, we can visualize the accuracy during the training.
[7]:
with plt.style.context('seaborn-white'):
    plt.figure(figsize=(10, 5))
    plt.title('Accuracy of the classifier during the active learning')
    plt.plot(range(n_queries+1), accuracy_scores)
    plt.scatter(range(n_queries+1), accuracy_scores)
    plt.xlabel('number of queries')
    plt.ylabel('accuracy')
    plt.show()